ap.setup
ap setup login | ap.setup
ap.setup

What is ap.setup or www.ap.setup?

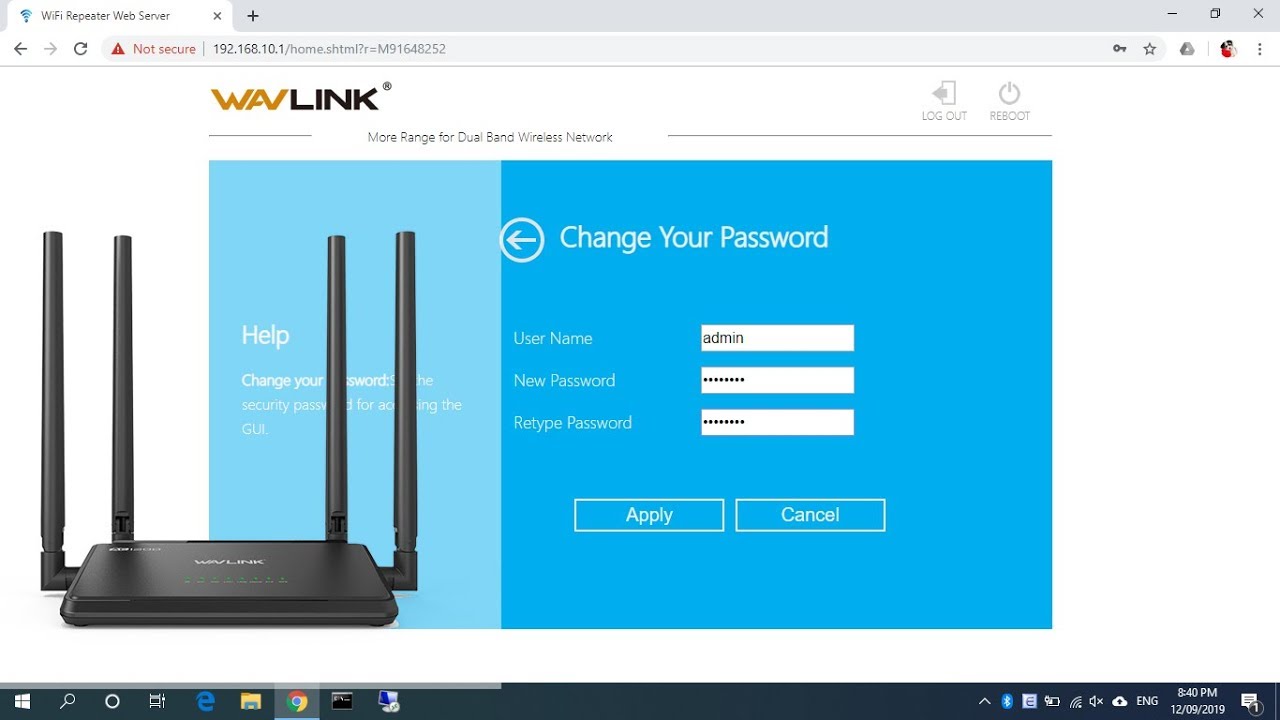
Ap.setup is a web-based utility interface that allows a user to control and manage the Wavlink Extender efficiently. A user can also connect to the ap.setup interface offline but the only condition is that he must be directly connected to the Wavlink extender via wired or wirelessly. You can access the ap.setup interface using browsers such as Google Chrome, Internet Explorer and Firefox. A user can also type 192.168.10.1 as the URL of the browser to access the web interface of the Wavlink Extender.

What if ap.setup is not working?

For users who are unable to ap.setup utility page, won’t be able to access the Wavlink extender remotely. A user must interact with the ap.setup interface to efficiently utilize the extender for maximum performance. There could be various possible reasons behind the failure of ap.setup web page.

What if ap.setup is not working

Here are some troubleshooting steps that a user can follow to resolve the above issue

  1. A possible reason behind the ap.setup window issue may be because of the problem in the physical connection between the extender and the router. You can confirm the connection by the LED indicator of the range extender. Any mistake within the connection may bring the ap.setup issue. A user can also check the setup guide to check the error in the physical connection.
  2.  Make sure you are typing the URL into the Address bar, not into the Search bar. Try to input the IP address into the Address bar instead of ap.setup. The default IP address of the Wavlink extender is 192.168.10.1
  3. Sometimes, the weak signal in the wireless connection may also lead to the ap.setup issue. Make sure your range extender is having a wired connection with the computer. Switch to the wired connection if there is a wireless connection between the range extender and your computer.
  4. Unplug all the devices and cables connected to the range extender. Power cycle your computer and router, Wait for 2 minutes, and reconnect them. Now, try connecting to the ap.setup web utility page. If you are still unable to connect, try the next troubleshooting step
  5. An incorrect IP address may also lead to the ap.setup issue. The device or computer with which you are trying to access the ap.setup window, must have an IP address assigned by the range extender. In most cases, the DHCP function is enabled with which the IP address gets automatically assigned to the computer. If the DHCP function is disabled in the range extender, you may have to manually assign the IP address to the computer.
  6. A user can only use referred browsers such as Google Chrome, Firefox, and Edge to access the web utility page of the Wavlink extender. Switch to any of these browsers, if you are using an unapproved browser.
  7. If a user has enabled the firewall and antivirus software in his computer, he might be blocked from accessing the ap.setup utility page. You need to disable the firewall and any other antivirus applications in the computer using the control panel of windows.
  8. Sometimes when the history or the cache memory gets piled up on your browser, it may deny you from accessing the traffic websites. You must delete the history and the cache memory of the browser and then try to access the web interface of the Wavlink range extender.

Note: If there is a network issue in your router connected to the range extender, you may contact the ISP (Internet Service Provider) of the network. A network issue may also lead to the ap.setup issue.

How to login to the ap.setup page?

A user can log in to the Ap.setup extender using the browsers of the computer. When the connection process is done, a user can perform the login process of the ap.setup page. You can use a browser to interact with the web interface of the Wavlink range extender. A user must know the correct credentials to log in to the ap.setup utility page of the range extender.

Here are the steps to log in to the ap.setup page

  • Launch a browser on your computer connected to the extended network.
  • Take your cursor on the address bar of the browser and type ap.setup.page on it. If you face any kind of error, type the LAN IP address of the extender as the URL of the browser.
  • The IP address of the Wavlink extender is 192.168.10.1
  • Hit enter and the default Wavlink extender login window appears on the screen.
  • Type “admin” as the username and mention the password you assigned during the setup process. Type “admin” on the password field, if you haven’t changed the default password yet.
  • Both the login credential fields are case-sensitive.
  • Click on the login button to log in to the ap.setup window. Now you can access all the features and settings of the Wavlink range extender.


wavlink extender setup

Note: Make sure you use browsers such as Google Chrome, Edge, Internet Explorer. Any other browser may bring failure in the login process of the Wavlink extender. Both the login credentials of the login window are case-sensitive, make sure to hold the shift key when you want to type an uppercase letter. Release the shift key when you want to type a lowercase letter.


How to change the password for ap.setup extender?

Changing the password could be an important step that plays an important role in keeping the ap.setup window a safe and secure interface. No user can change the password until or unless he has the current password of the login window. Users are recommended to change the default password as it can risk the interface of the ap.setup window.

Steps to change the password for ap.setup extender

  • Launch a browser on the computer connected to the home network
  • Type ap.setup on the address bar of the browser and hit enter.
  • The default Wavlink extender login window appears on the screen.
  • Type “admin” as the default username and type the password you assigned during the setup process. If you haven’t changed the default password type “admin” on the password field.


  • Both the login credential fields are case-sensitive.
  • Click on the login button.
  • The default web menu screen of the ap.setup appears on the screen.
  • From the main navigation panel, go to the Administration tab, select the Settings tab then click on the Password settings tab.
  • The password settings page appears on the screen.
  • Scroll down the page and find the admin password field.
  • Remove the current password and type a desired password on the new password field and retype it on the Verify password field.
  • Select the security questions for the recovery process.
  • Make sure the answers to those questions are relatable and easy so that when you want to recover the login password you can easily do so.
  • Click on the Save button to apply the settings you made.

Note: Users are recommended to enable the password recovery feature in the Wavlink extender so that in future if one forgets the password he can recover it using the recovery feature. You must answer the security questions correctly to recover the forgotten password successfully.

How to install a wavlink extender?

The installation process of the Wavlink extender consists of the placement and the connection method. As placement is a vital part of the extender setup process, users must find an optimal spot to place the Wavlink extender. The connection of the extender with the router can either be done through a wired connection via Ethernet cable or through a wireless connection via Wi-fi signals.

Steps to install a Wavlink extender

  • Unbox the extender along with the Ethernet cable.
  • Plugin the Extender into an electric outlet to turn it on.
  • Wait about 50 to 60 seconds to let the Power LED lit.
  • Once the LED indicator starts flashing red, go to your home router and press the WPS button.
  • When the Wi-fi signal on your router starts flashing, you must go to the extender and press the WPS button for about 6 seconds.
  • The blue LED on the Wavlink extender starts flashing (it may flash red)
  • Note: If the Wi-fi LED of the extender starts flashing red, it means your extender is not within the adequate range of the router.
  • You need to wait for around 60 seconds, to allow the extender to get connected to the router.
  • Once the connection process is done, the LED on the range extender will turn blue.
  • Go to your mobile device and open the Wi-fi settings of it.
  • Scan for the available Wi-fi networks and when the list appears. Search for the default network name of the range extender.
  • Note: The default name of the Wavlink extender is Wavlink-AC, select the network name and connect to the extender’s network.
  • Now, open a web browser and type in ap.setup or 192.168.10.1 on the address bar of the browser.
  • Type the default password i.e “admin” on the password field then click on the login option.
  • You can now select the region where you are in, Time-zone according to the region, and can add a new login password for the Wavlink extender login window.
  • Click on the Next option when you are done.
  • In the next one select “Repeater Mode” and find the host’s Wi-fi network name on the list.
  • Type in the Wi-fi password of the host’s network and click on the Connect button.
  • Wait for a few seconds until the screen shows the 100% connection.
  • Once the connection process is done, wait for 60 seconds to allow the transmission of Wi-fi signals.
  • When the Wi-fi LED comes back to solid blue, it indicates that you have clean and clear Wi-fi signals.
  • Now, you can relocate your range extender to an optimal place.
  • When you connect it, wait for one to two minutes to allow it to connect.
  • When the LED turns back to blue from flashing red, it means it has connected to the router.

Note: You can take help of the Status LED of the range extender to detect an optimal location for your device. If the Status LED is red, it means your range extender is too far from the router, if the Status LED is yellow it means the signals are good and if the Status LED is blue, it means the Wi-fi signals are excellent.

Not able to login to ab.setup page?

If a user is unable to log in to the ab.setup page, there may be several factors behind it. During the login process, users are highly recommended to have a wired connection between the computer and the Wavlink device to smooth out the whole process.

Steps to resolve the ab.setup login issue by attempting the following solutions

  1. There must be a proper hardware connection between the computer and the Wavlink device. If you are connected via a wired connection, make sure that the indicator along with the LAN Port is lit. If the LED on the Wavlink device is blue, it means the physical connection between the devices is proper.
  2. A user must switch to a wired connection if he has a wireless connection – Use an Ethernet cable to connect the computer to the Wavlink extender.
  3. You need to ensure that your computer has obtained the correct IP address. Use the Control Panel of the window to make sure of it. If you still cannot log in, proceed to the next troubleshooting step.
  4. Switch to the other browser or delete cookies of the current browser using the settings tab. Select the items such as downloaded history, browsing history, cookies, and Internet files to clear out and click on the Ok button.
  5. You can restore the default settings on the range extender to resolve the ap.setup login issue. Press the Reset button behind the range extender for about 10 seconds. All settings including the networking, administrative, and security will get removed from the Wavlink device.
  6. It may also be a possible reason that the drivers of your computer are not updated which is causing the ap.setup login issue. You may have to update the drivers of the computer to perform the ap.setup login process. You can refer to the manual guide for more information.

Note: Before the login process, a user has to make sure that he knows the correct login credentials of the extender login window. Any fault in login credentials may deny you from being redirected to the ap.setup page.


Deprecated: mb_strlen(): Passing null to parameter #1 ($string) of type string is deprecated in /home3/hprincsq/apset-up.net/wp-content/plugins/smartsupp-live-chat/vendor/smartsupp/chat-code-generator/src/Smartsupp/ChatGenerator.php on line 347